
I made a Grab This Button Tutorial ages ago, but a commenter on my Reader Feedback Questionnaire brought it to my attention that the tutorial was, well – janky. There – I said it. It didn’t work. Sooo I decided that instead of just updating the old one, it’d be prudent to make a new one so that all my newest readers can benefit from this one as well! This tutorial may be a bit too basic for some experienced Bloggers, but I’m going to go step-by-step for the newbies!

1. If you do not already have a button to use, then you’ll need to create one. I made mine in Photoscape, a great free download, but you can also use Microsoft Paint. You can adjust the size under Image – Attributes.

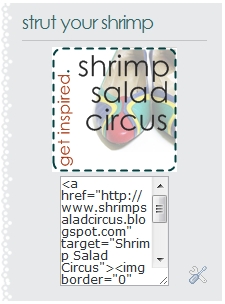
2. Upload your button to a photo hosting site. I recommend Photobucket. After uploading, grab the link to use for the next step.


5. Paste the code into the Content box. Where it says YOUR IMAGE URL, paste the link from your button on Photobucket. For YOUR SHOP/BLOG URL, type in the url address of the shop or blog that you would like your button to link to. Be sure to leave the quotation marks and replace only the text. Put whatever title you’d like for your widget. Click SAVE, drag the gadget to wherever you want it on your sidebar, and save the layout.
That’s all there is to it! If you need clarification on anything, just leave me a comment, and I’ll try to explain! I also love to know when anybody uses my tutorials, so please do tell me if you put this widget on your blog!!!


Hello! I decided to start a small business in retirement, and I’m thinking of opening an online store. So far, I understand how social networks work, but I understand that I also need a website. Who has already encountered this, maybe there are recommendations on what to read, I have this guide on how to make ERP system , but would like to get some more advice
I already know from experience that if you run into a problem with the creation of the site, it is usually easy to solve if you turn to experts in time. It’s not difficult and everyone can do it. The most competent decision would be to turn here how to create a website like airbnb for information about it. And I found it very helpful when I was creating my first site and was afraid to make a mistake, so they are very grateful for these tips and help in fact, which is difficult to find anywhere now, but there is.
this is insane dude
I have always wondered how to do this but have felt too embarrassed to ask. Now I don’t have to worry about that pesky embarrassment anymore…at least not until my four-year-old announces to the entire mall that he has “TO POOP A REALLY BIG POOP” again.
In other words, THANK YOU!
i figured it out! if you want me to email you the code just let me know! i tried to leave it here in a comment but blogger doesn’t like that!
Sorry guys – it’s message up again!!! I’m going to have to mess with it when I get home from work, so be sure to check back. Blogger keeps converting the HTML that you’re supposed to be able to copy/paste into the actual ‘grab’ box, against my will!
ok, so i got so excited i had to go and do it right now…it worked…minus the “grab” part. my photo and link is there but no one can grab it from my site and put it on there..i think i need some help…i’m usually pretty good at this blogging stuff!
oh yours the best!! seriously i tried doing it like 5 times thinking i did it wrong but look at you! thanks so much for being such an awesome blogger and reposting this!! thanks!! i can’t wait to use it now!! yyaaaah!!!
Thank you so much I have been wondering how to do this! Great tip!
Thank you! This is very helpful 🙂
Thanks! Bookmarking for later.
Thanks this was really helpful!