
Welcome to my new readers from Pinterest, Shop Ruche, and the internets far and wide! If you like this post, you might consider subscribing by RSS or email to get updates and exclusive content!
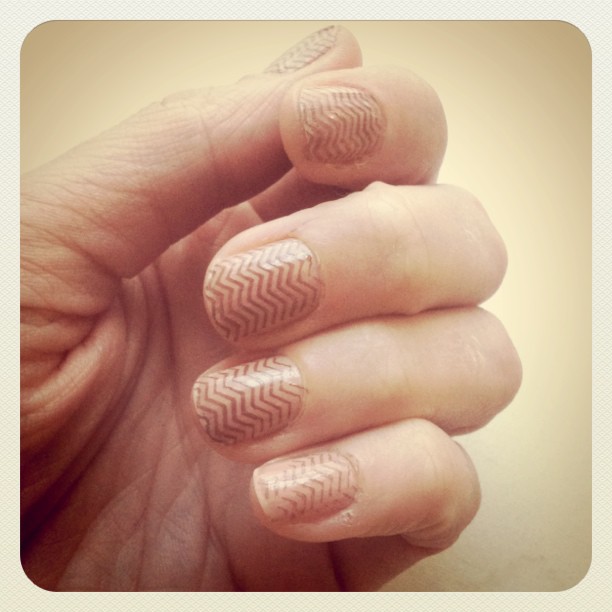
Now that I’m done being a student and am safely nestled into the world of nine to five, I’ve had to reign in some of my fashion inclinations just a bit. No more purple hair. No more neon blue fingernails or wild nail art. No more tie dye leggings. During the week, anyway. I put this nude chevron manicure tutorial together to give you a fun way to flaunt your character without going too wild. Plus, chevron doesn’t seem like it’s ever going out of style, so enjoy!


What You Need:
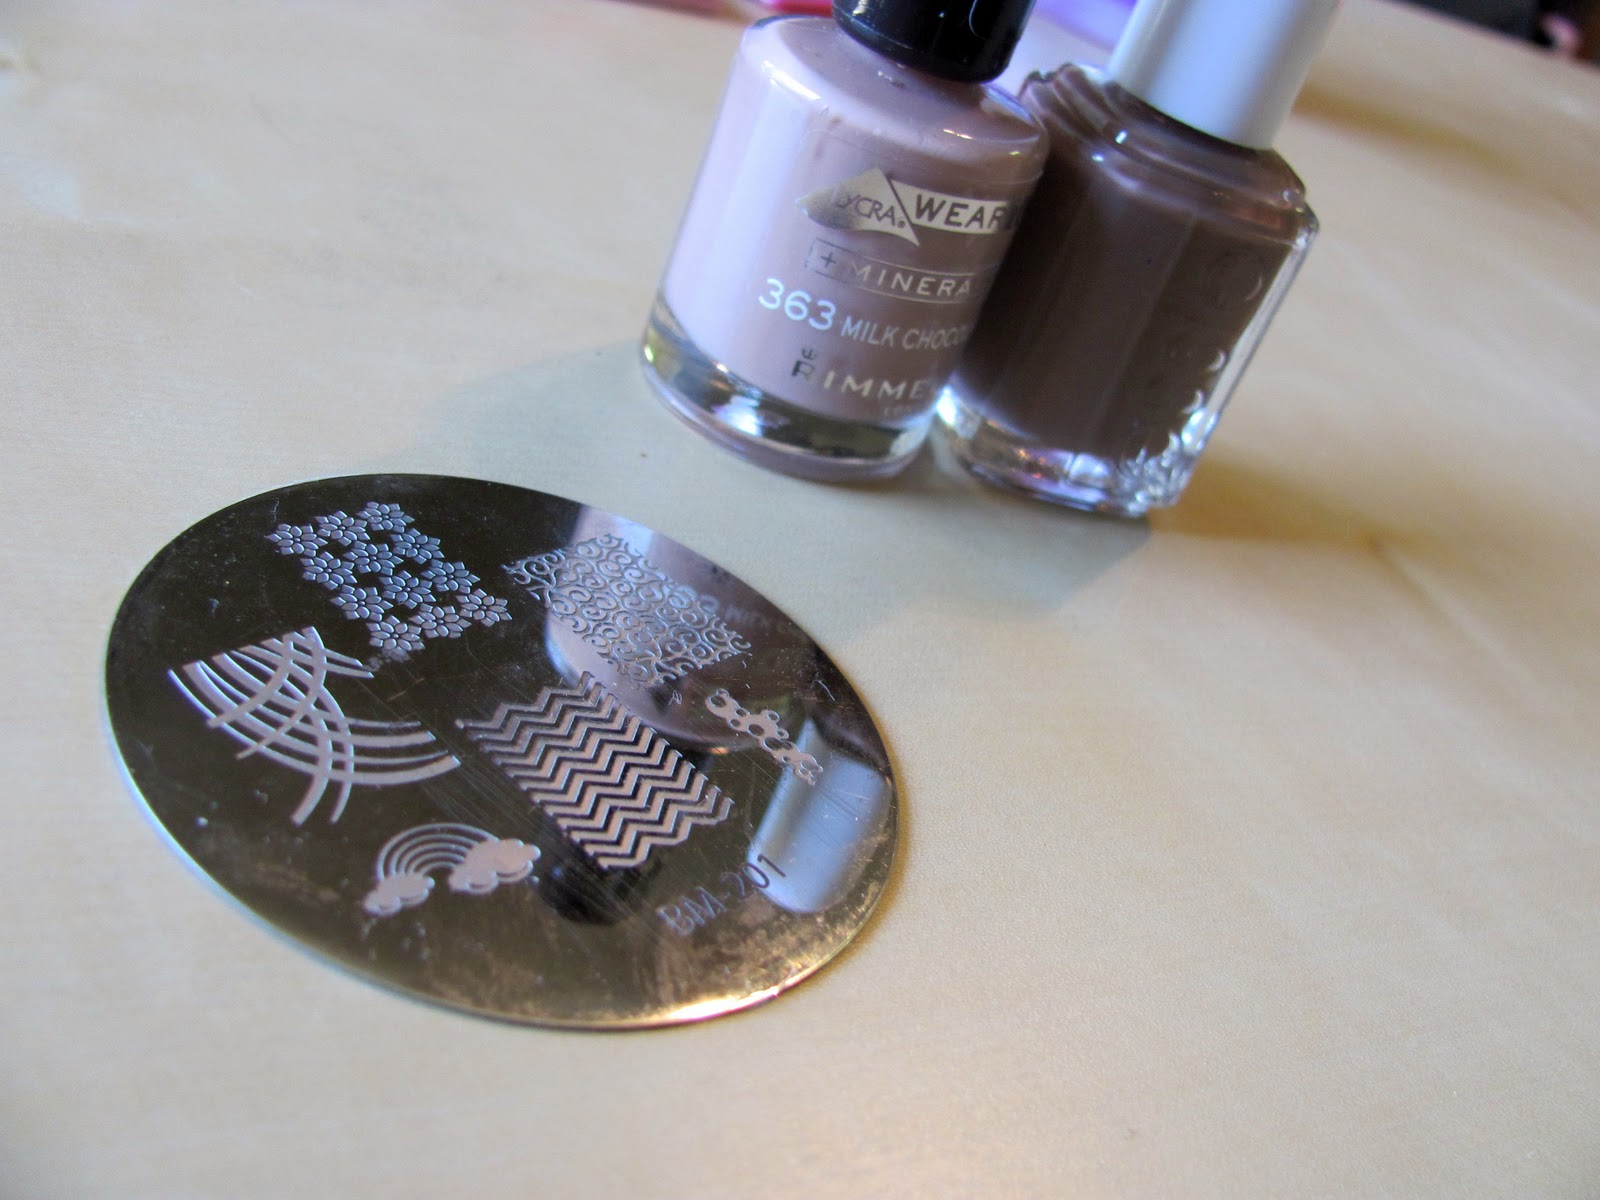
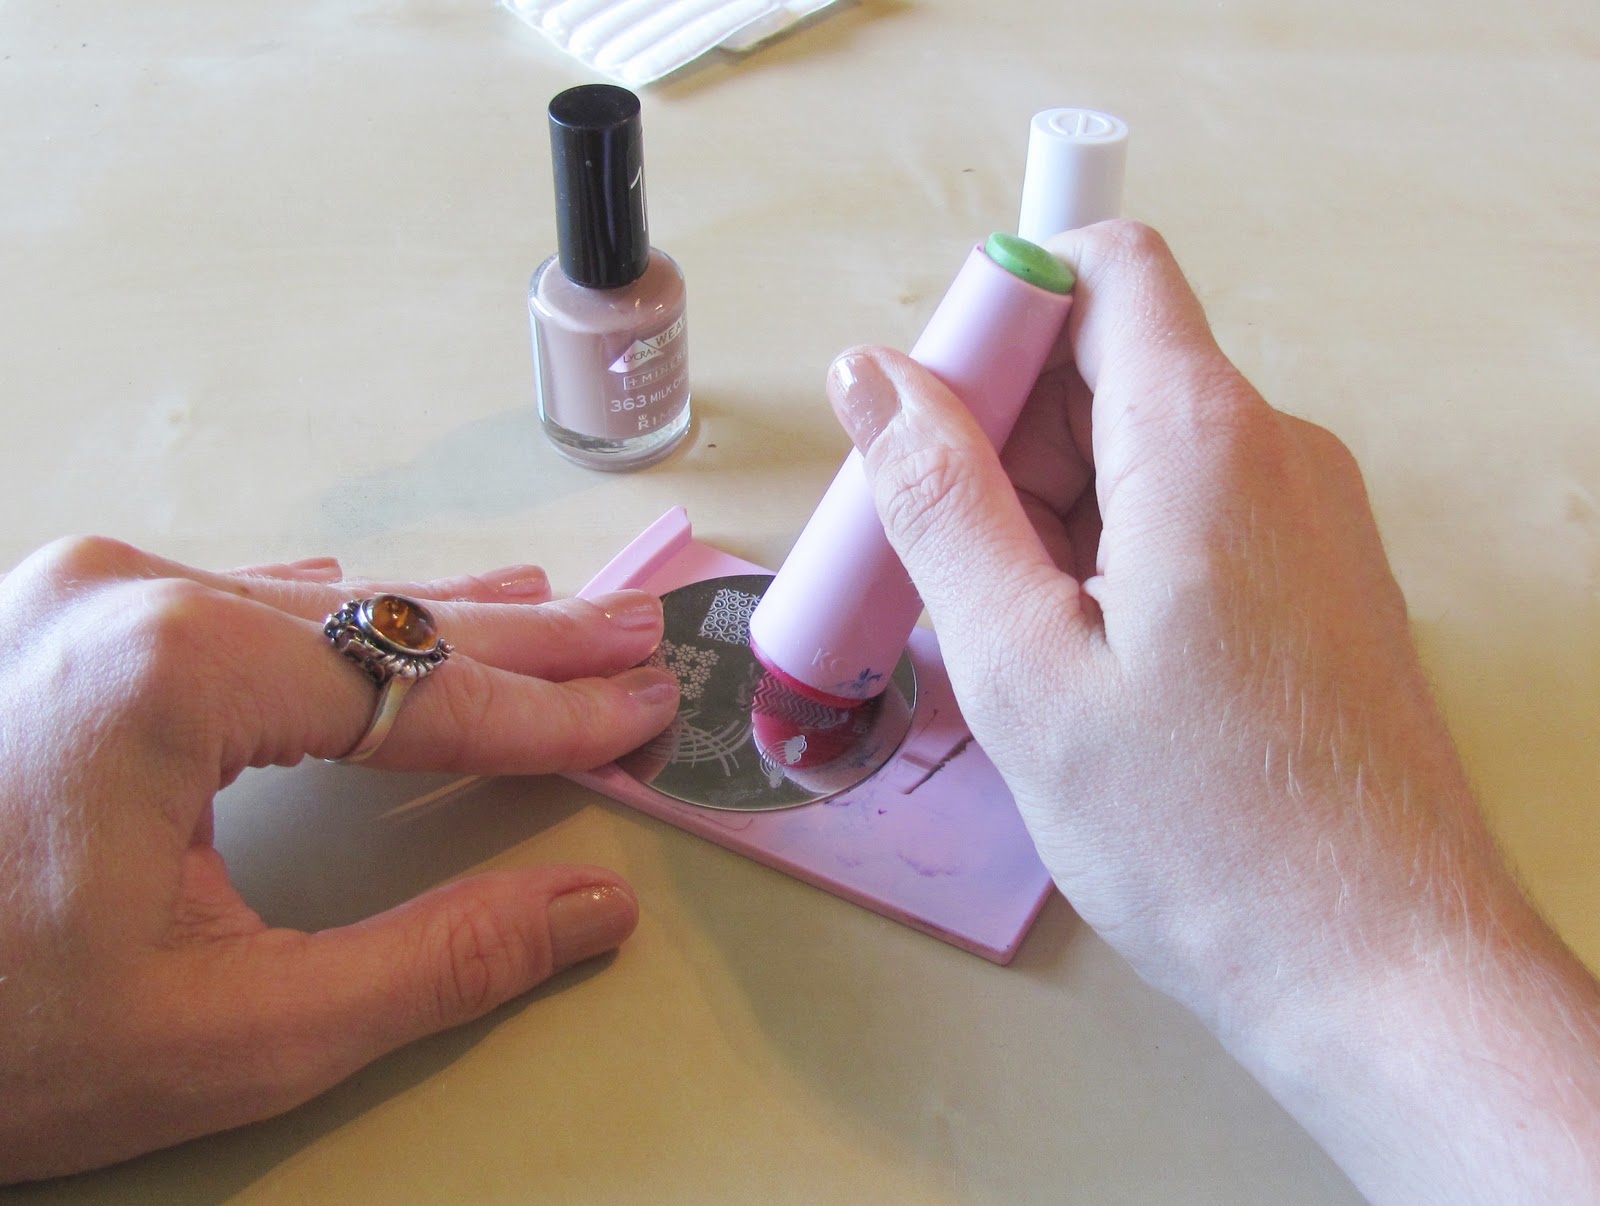
- 2 nail polish – light and dark – I used Essie in Hot Coco ($4.80) for the stripes over Rimmel Milk Chocolate ($4.49)
- polish remover
- cotton pads
- Q-tips
- Konad stamper and scraper

- Bundle Monster stamp set
- Konad plate holder
You can also shop various individual nail plates or single-sided stampers, etc. (though I recommend the double-sided stamper) with the full line of Konad nail stamping components!
A reader asked me what colors these were: I used Essie in Hot Coco ($4.80) for the stripes over Rimmel Milk Chocolate ($4.49). That Rimmel shade is maybe my favorite polish color ever, and you can only find it online now.
A reader asked me what colors these were: I used Essie in Hot Coco ($4.80) for the stripes over Rimmel Milk Chocolate ($4.49). That Rimmel shade is maybe my favorite polish color ever, and you can only find it online now.


1. Start with clean, trimmed, filed nails, without or without a clear base coat – your call. Paint one to two thin layers of the lighter colored polish on each nail. Allow it to dry completely.

2. Select the disc with your design of choice on it. Be sure to peel the protective plastic film off before you try to use it.
Each disc will have multiple designs on it. Some are little spot-designs; some are french tips; and some cover the entire nail. The chevron pattern that I’m using covers the whole shebang.
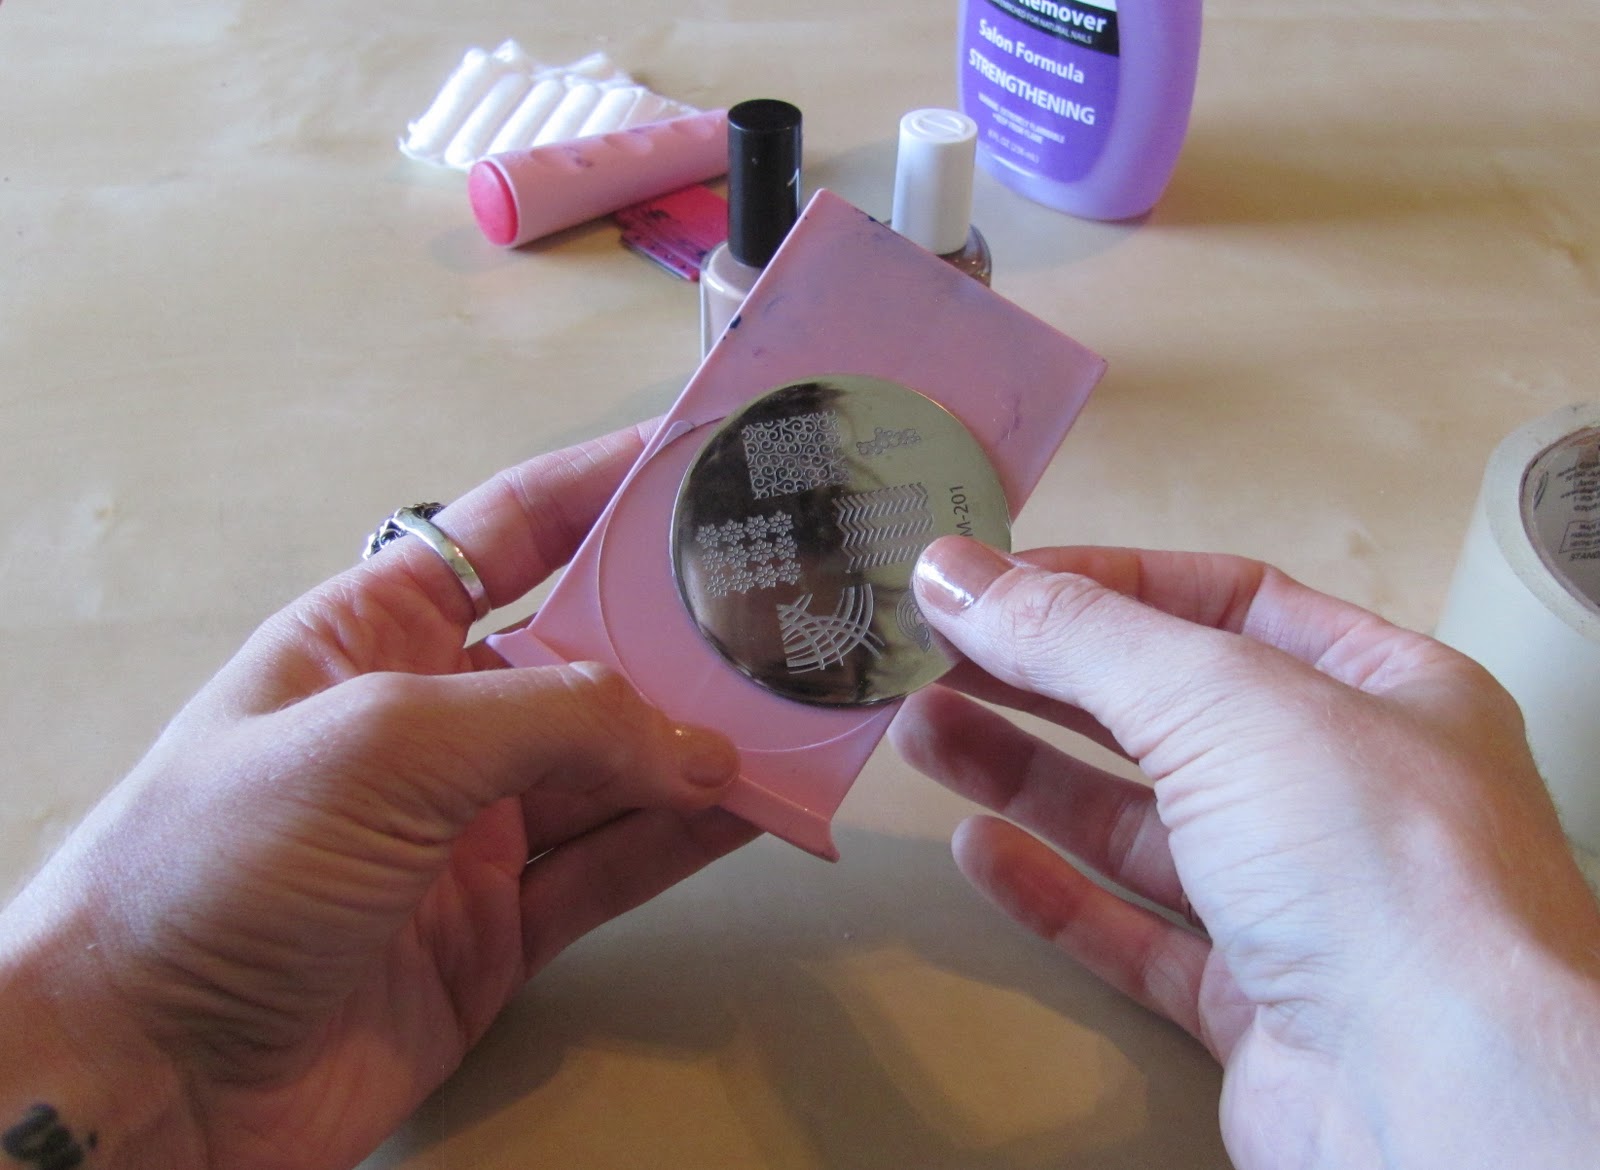
3. Place your disc onto the little plate holder. This isn’t essential, but it really keeps the mess down. Really.
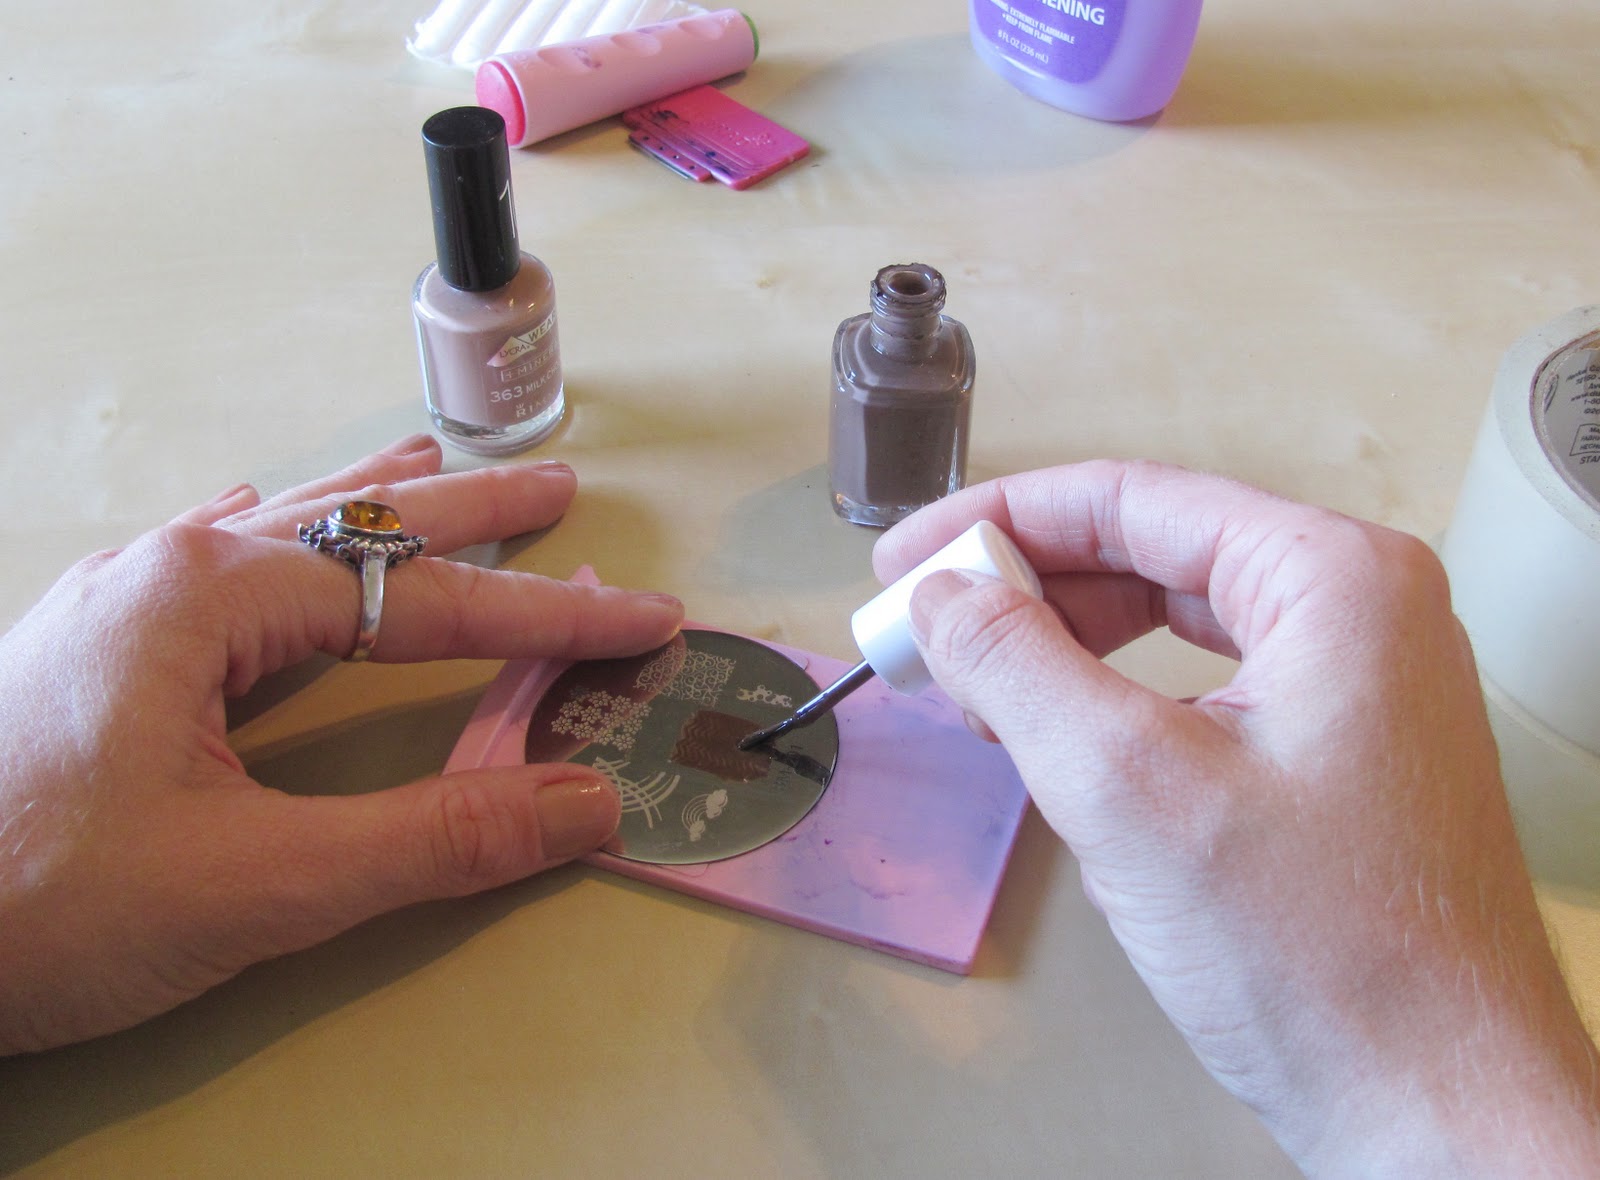
4. Turn the disc so that your design face inward. Paint a fairly heavy layer of polish onto that design only..

It should cover it so that you can hardly see the design beneath it

5. Use the scraper to swipe the excess polish off the disc and onto the space on the plate holder. Don’t worry about making a mess. You can always wipe the goop off with remover later. It’s important to do the next few steps quickly so that the polish doesn’t dry. You don’t have to buy the scraper, but don’t use a razor blade. It’s too sharp. Use an old gift card or credit card instead.

The design on your disc should now have polish only in the depressions, filling the indentations with color. There should be no other polish on the metal disc.
6. Take the end of your stamper, and begin to lay it down at the side of the design on the disc. Using very firm pressure, roll it across the design. It will pick up the polish in the depression of the design as you go.

7. If you’ve done this properly and not waited too long, the stamper will have picked up your entire design. This takes some practice – trust me. Don’t worry if you don’t get the whole thing the first few times.
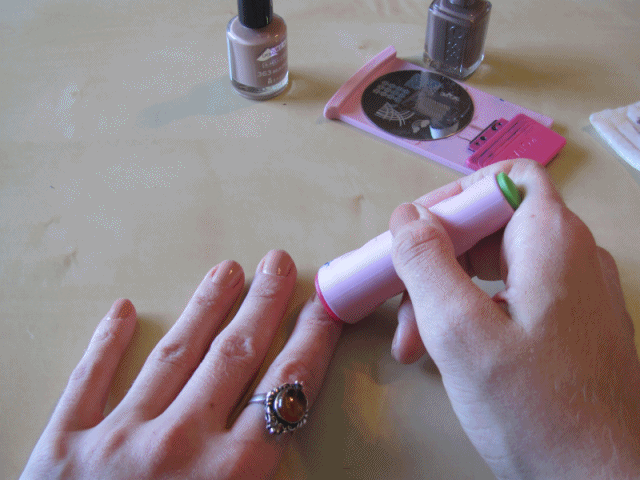
8. Quickly take the stamper and place it at the edge of a fingernail, being sure that the bottom of the image is lined up with the base of your nail. Start with a smaller fingernail, like your pinkie, since you’ll have a bigger margin for error there. Pressing firmly, roll the stamper across your nail the same way you rolled it to pick the image up in the first place. It should leave behind the design, with nothing left of the stamper. Your first few times will probably leave some extra on the stamper. No worries – onto the next step!
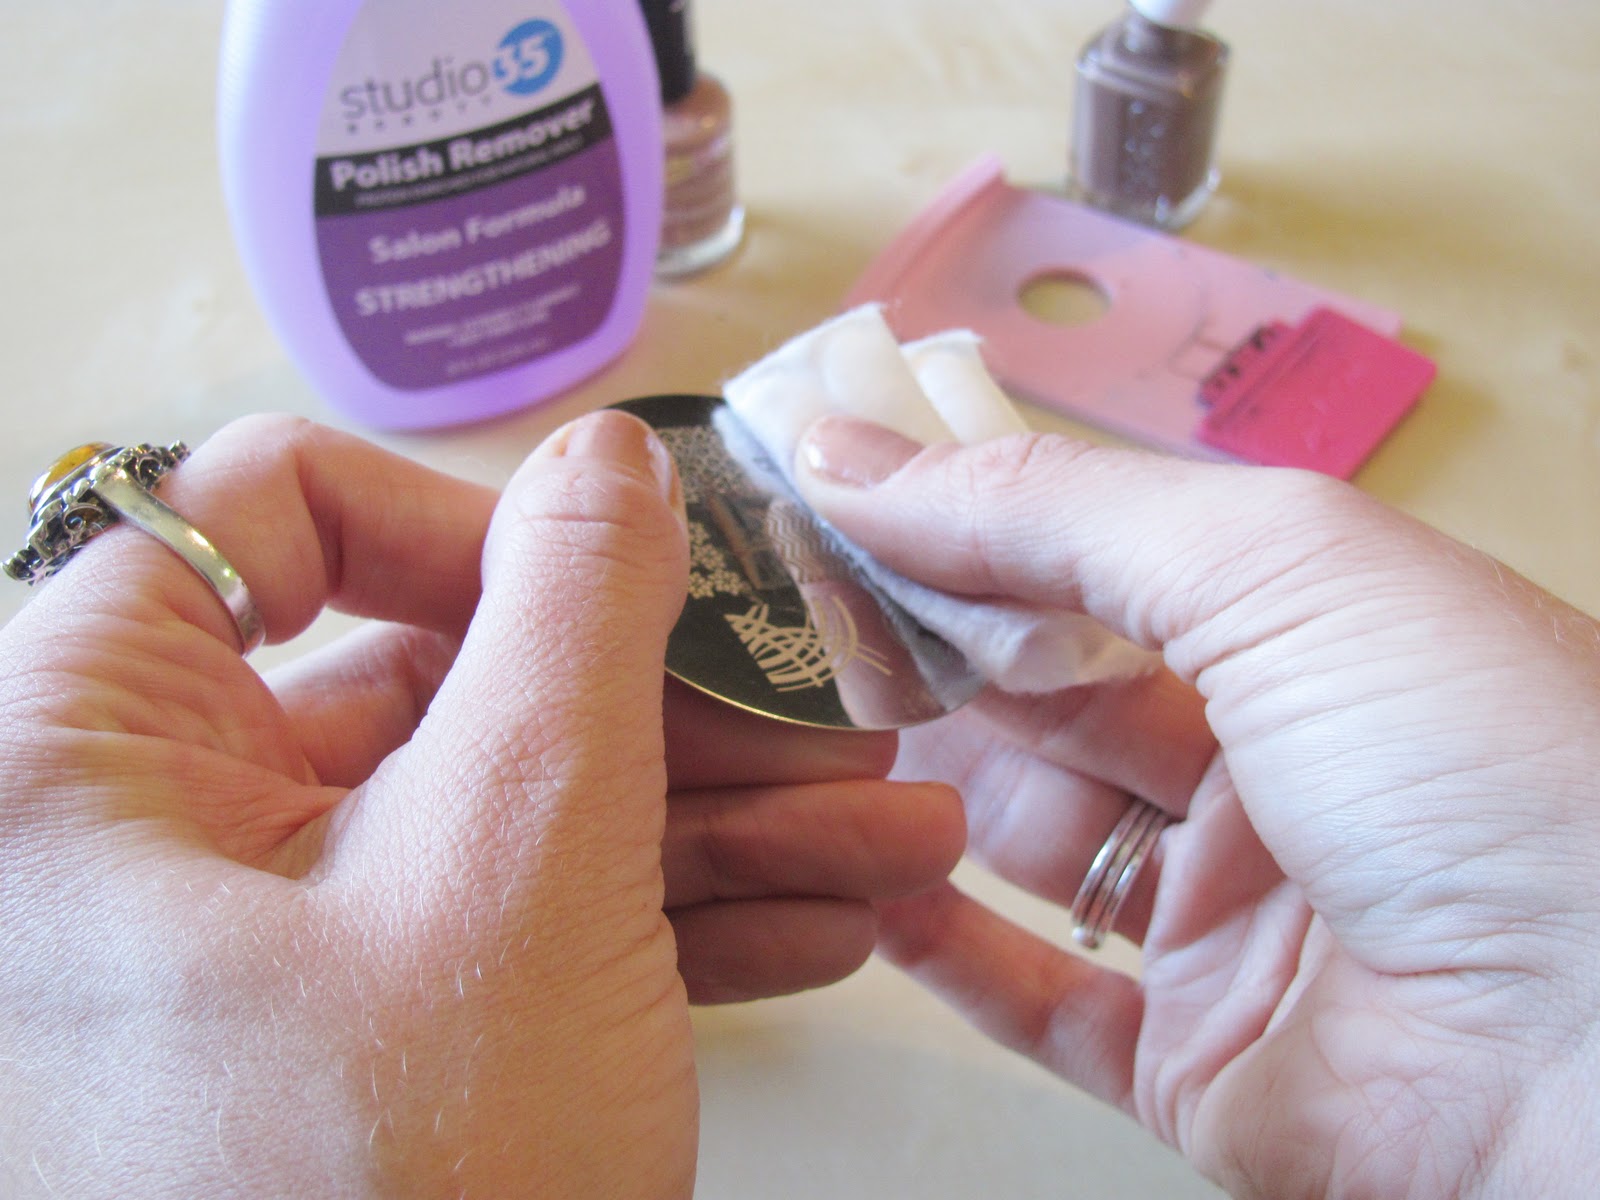
9. Using a remover-soaked cotton pad or ball, scrub the polish out of the design on the disc. You can also clean the scraper, holder, and stamp. You will probably only need to do this every 4-5 times.

10. Here’s the part where other bloggers are totally perfect and never mess anything up. I, however, am a real person. I screw things up quite righteously, as you can see by the cute little chevron design all over my fingers. Not my nails. My fingers. Clean this up with a Q-tip dipped in remover.

11. Here’s your last chance to really mess this up. You need to paint a clear coat over the whole nail, but you have to do it in about three strokes. If you keep brushing at it to spread the clear polish, the design will re-wet and start to smudge and blend together. Que tengan suerte, ladies (Good luck!)!


These suckers can be tricky. Still have questions? Leave them in a comment, and I’ll answer you in a day or two – promise!!! Oh, and if you actually do it, I wanna see pictures!!!


Great tutorial and love your tattoo.
Fab tutorial! I’m having a chevron themed linky party and I’d love you to link up:
http://burlapanddenim.com/2012/03/party-on-mondays-2/
Arianna – Too funny; I hadn’t thought to mention that! lol Definitely good advice!
“Be sure to peel the protective plastic film off before you try to use it. “
EXACTLY what I didn’t do the first time I tried to use it.
(*why the hell it doesn work?! ouff…oh..what’s this? OH! Wonders… a plastic film!!!*)
This comment has been removed by the author.
thank for the tutorial and link to the image plates! I bought a set, and tried it out this weekend. So much fun!
I posted about it here: http://nailingit2.tumblr.com/post/15921199185/chevron-nail-stamp-my-wonderful-sister-gifted
cool nail designs..
i think this is much easier to do and cheaper than going to the salon and pay $ for that.
xign andrew
2012 Medical Advances Forecast: Vaccines for Cancer and Malaria Included
sphygmomanometer
I love this mani! I can’t wait to try it. Thanks for the tutorial! 🙂
oh my heck! I love it too much! thanks for sharing it on the mom it monday link up!
I’ve shared it on the Brassy Apple FB page! 🙂
Hi,
I’m a french fan! I love your blog!
Thanks for the trick!
Cynthia.
jennifer – I’ve updated the colors under the “what you need” section. Thanks!
Silje – Maybe you’re using an older polish? Make sure that you clean the plate and the stamper with polish remover before you begin so that aren’t any oils or dust left on there.
All – I’ve put together an FAQ post here: https://shrimpsaladcircus.blogspot.com/2011/11/how-to-sday-aztec-nail-tips.html
– Lindsay
* bought
Hi ! So nice nails! loved it : )
I byed konad for a while ago, but it doesn’t work for me. The pattern from the plate doesn’t stick/get on the stamper. I do it quickly, but the pattern don’t get on the stamper anyway how hard I push it on the plate. Do you have any tips for me? I have seen many clips on youtube and they do so quick and easy.
Super cute, what color polishes did you use- can you list the color names please?
These nail plates are amazing! Where did you buy this?
-M from http://fashionotes.com
Thanks so much to everybody who’s stopped by from The Beauty Department, and welcome!!!
Feel free to comment if you have any questions!
– Lindsay
Oh my goodness! What an amazing little gadget! And such cute/interesting designs. This looks amazing, definitely beats drawing each line on by hand.
http://a8.sphotos.ak.fbcdn.net/hphotos-ak-ash4/298121_2095474787219_1255800157_31863712_117408543_n.jpg
This was my first try, my second and third have gone much smoother 🙂
This looks very pretty! I love chevron It’s such a subtle yet different and interesting design with the colors you picked.
Can you let me know where the ring in the last pic came from? I love it!
oh wow! that looks perfect!! love those two colors you chose, they compliment one another so well 🙂
Anonymous, thanks for checking out the tutorial!
You can find links to all the supplies under the “What you need:” section at the top.
Here’s a link to the nail plates with the designs:
http://www.amazon.com/gp/product/B004XJNQXW/ref=as_li_tf_tl?ie=UTF8&tag=shrsalcir-20&linkCode=as2&camp=217145&creative=399373&creativeASIN=B004XJNQXW
– Lindsay
Hey, where can I get the nail plate from? Do they sell it in stores? I’ve never seen/heard of it before, but it looks sweet!
I’ve never seen anything like this before, thanks for sharing!!
Stephanie
This is wonderful! I’ve been getting so many compliments 🙂 Thanks!
http://www.flickr.com/photos/beeeesharp/6267719133/
I blogged this pretty nail idea here: http://lettherealworldbegin.blogspot.com/2011/10/pretty-pinterest-nail-art.html
This is awesome!
That’s pretty cool. I want one.
Amazing! I want one of those! Chevron is so, so gorgeous.
Those are super super cute. I might have to look into one of those stampers!!
Thanks, everybody – glad you’re liking the tutorial!!! I broke it down into a lot of little details to make it easier to understand, but it really is SO simple – promise!!!
– Lindsay
This looks really cool. All the nail stamp designs I’ve seen here are little hearts and flowers, nothing for people over the age of 12.
I’m impressed by your chevron nails! 🙂
I really like the colors you used here. I love pretty much all nail colors that are in the nude shades.
http://www.iwantaslice.blogspot.com
I’ve never seen this done before! Cool!
They look so beautiful! I truly love this, you did a fantastic job! Thanks for sharing 🙂
More than the nails, I love your tattoo – Vivir 🙂
mubinster at gmail dot com