
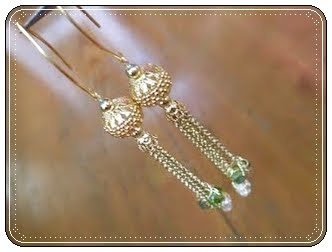
Somebody finally answered my plea for tutorials, so you no longer have to deal with endless pictures of my furniture and roll your eyes because I really just spray painted a thrift store table anyway… {Although I was pretty happy with the sushi cake…} The darling Katie of Lemon Jitters has volunteered her Elegant Earrings Tutorial up for your crafting enjoyment. This tutorial was originally created for the exchange program on Totally Tutorials, so I encourage you to check it out {Read: free supplies in exchange for your tutorial!}.
 Supplies:
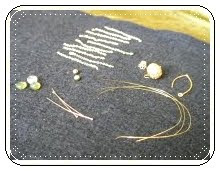
- – Earwires – I used these beautiful bali vermeil (24k gold over sterling silver) earwires from Bobbi’s This N That. She also supplied my project with the great green and white glass beads you see! She is such a nice seller. Check her out!
- 20 pieces of chain. I used 1.75 in for each length of gold toned, upcycled chain. Make sure you cut 4 pieces a bit shorter than the rest, at varying lengths.
- 2 small gold spacer beads (Mine are reclaimed vintage)
- 2 filigree beads (I used 4 upcycled beadcaps to make the beads)
- 2 headpins (the beautiful ball headpins I used are from Bobbi’s This N That)
- 6 beads (I used really small, Czech glass rounds, also from Bobbi)
- 6 pieces of wire (I used 28 gauge, gold toned wire. I cut the length aroudn 5.5 in. The length and gauge is up to you and the size of your beads/chain)
- 2 beadcaps (preferably fluted, not round)
- Place one of your beads on a the center of a piece of wire and twist the wire in the typical wire wrapping fashion. Only you don’t stop wrapping as you usually would. Twist the entire length of wire together.

- Thread the twisted wire strand with a piece of chain. Once the chain is resting at the end of the strand, by the bead, begin to wrap the wire strand around the bead. Don’t be precise – just wrap each bead organically. They will all look different – that is part of the charm. 🙂 You will do this for all 6 beads.
- Once you have wrapped all 6 beads onto chain, create a loop in your headpin and begin threading the chains on to the pin. I used this pattern: 2 plain chains, a short one with green bead, 2 plain chains, one with a white bead, 2 plain chains, a semi-short one with a green bead, 1 plain chain. Then, add your filigree bead and small beads (whatever you’d like!) to the headpin.
- Wrap your headpin around the earwire and voila! You have a lovely earring. Now repeat and you have a lovely pair of earrings 🙂


You can find the finished product at Lemon Jitters on Etsy. Thanks to Bobbi at Bobbi’s This N Thats for donating some lovely supplies! And thanks to Dotty at Totally Tutorials for providing this tutorial exchange opportunity!
 Ms. Lemon Jitters Herself:


Aw, thanks Kate!
How cute is she?!
Awesome tutorial.
nice!! 🙂
i also love Bobbi’s this & that – especially the fact that she’s also in Ontario, so i get my supplies in a couple days (instead of weeks).