
Last week I kicked off my new How to Start a DIY Blog series with a comparison of Blogger vs. WordPress. Blogger is easy enough to set up without a lot of back-end know-how. Shrimp Salad Circus is a WordPress blog, so today I want to walk you through actually setting up a brand-spankin’ new WordPress blog.
P.S. If you do start a new blog, I want to see! Leave your brand-new URL in the comments so I can pop by and pay you a visit!
How to Start a DIY Blog
How to Start a Blog in Under an Hour
How to Start a DIY Blog in Under an Hour

1. Select a Hosting
I use Bluehost for Shrimp Salad Circus. I highly recommend it for a few reasons:
- It’s cheap, cheap, cheap. Like, less than one coffee shop visit per month.
- It comes with a free domain name. Painless.
- It’s super easy to set up. You can be up and running (read: publishing your first blog post) within the hour.
As you can see in the landing page image above, you can get hosting with a domain name starting at $3.95/month. If you’re just planning on having a single blog, whether for business or hobby, the starter plan is probably all you’ll ever need. Note that the discounted rate is for booking all at once. It can seem more expensive up-front, but it’s a lot more affordable when you consider the long-term savings.
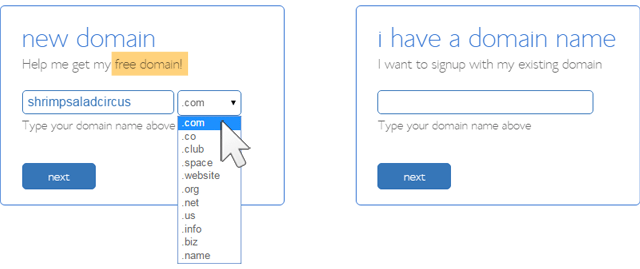
2. Choose a Domain Name
This page pops up after you select the starter plan in Step 1. You can use the little box up there to check the availability of any domain names you want. Since Bluehost has limited options for not-com domains, I recommend starting with a .com.
I talk more about the pros and cons of not-com domain names (and the story behind Shrimp Salad Circus!) in this post if you want to know more.
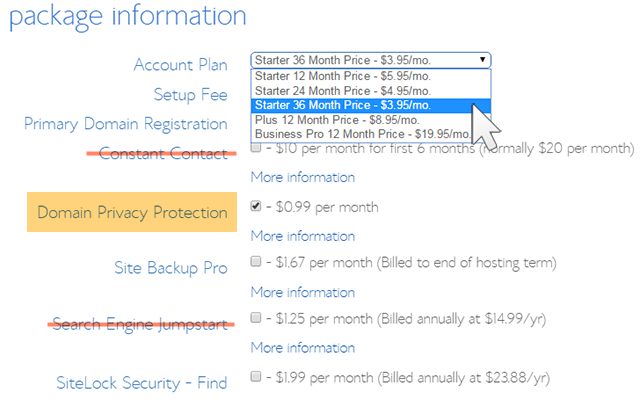
3. Select Package Add-ons
When you’re at the checkout page, picture above, you’ll have a few options to select from. I outline them below in detail, but the bottom line is that I recommend the one highlighted in yellow; don’t recommend the two crossed-out in red; and I recommend WordPress plugins that can cover the other two for you.
As I mentioned earlier, it’s cheaper to pay for your hosting up-front, just like buying bulk at a warehouse store. However, you do have the option of booking 12 or 24 months if you’re not ready to seal the deal on 36.
- Constant Contact – This is an email newsletter program. You might want to look into it later, but you’re probably not ready to put money into this yet when there are free options. I use MailChimp personally and have been really happy with it.
- Domain Privacy Protection – This is the one option I definitely recommend you go ahead and add. It hides your personal information from the public WHOIS database so that the public can’t see your name, address, email address, and phone number. Otherwise, all that information is public, which makes me really uncomfortable.
- Site Backup Pro – This is an automated function to backup all your files daily so that you can recover them right away to fix your site if anything breaks or goes wrong. You definitely want to have some sort of backup protection, but WordPress has some plugins that do this, too. I use VaultPress because it came highly recommended by blogger friends.
- Search Engine Jumpstart – This promised to get you listed quickly in all the search engines. I consider this a waste of money because, while they say that 85% of web traffic comes from search engines, as a craft or recipe blog, I actually get way more of my traffic from Pinterest. Plus, there are lots of free, effective ways to make sure your blog is search-friendly.
- SiteLock Security – This service provides security, such as spam and malware monitoring. I use the Jetpack and Wordfence plugins for free and have had no issues with either of these problems.
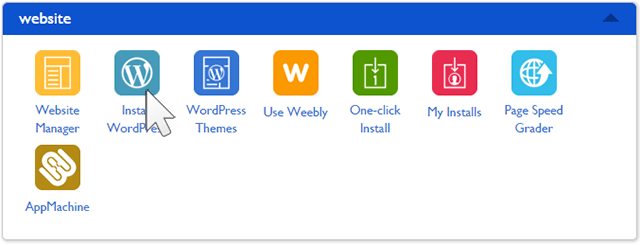
4. Install WordPress
So now that you have a hosting account, go ahead and log in.
Find the “website” section on the dashboard, and click the Install WordPress button like in the image above.
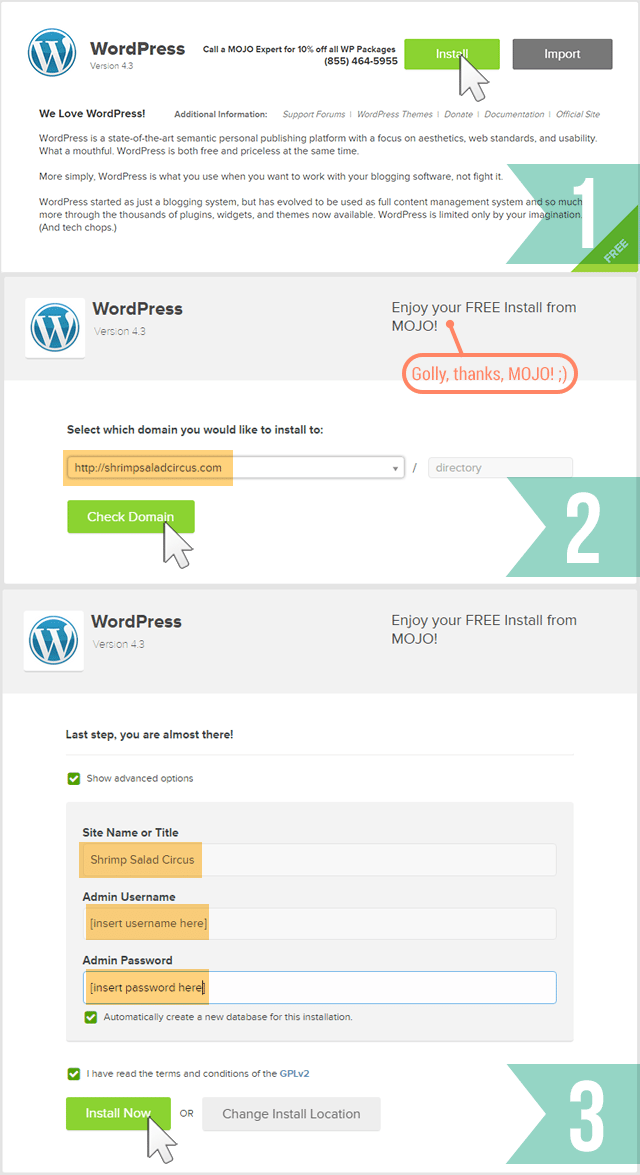
Finally, you’ll get a popup bar telling you your installation is complete. You can now click through to see your Installation Credentials. Copy the admin URL and paste it into your browser’s address bar.
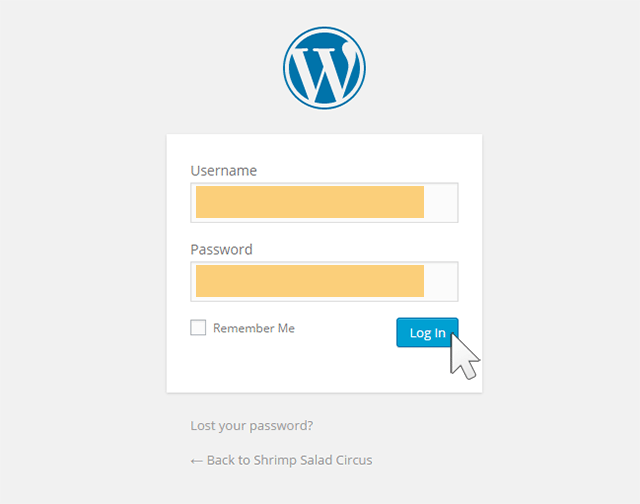
Now you can log right into WordPress from that admin URL using the username and password you just created. Enter your username and password, then click “Log In.” This will take you to your WordPress dashboard. From here, you can control everything to do with your WordPress site, such as creating pages, writing posts, and changing the appearance.


I am extremely intrigued in this subject. Even though I have read numerous articles, I believe yours is the best.
globle game
It’s exciting to write a DIY blog In Under an hour, I Think A DIY blog is a type of blog that focuses on various themes related to do-it-yourself crafts, projects, and other activities, which is also associated with assignment Writing service experts Because it’s dependent on your knowledge, research, or do clarify the task.
Hello my friends. I want to recommend you great guys who made me a great Fitness App https://perfsol.tech/ . Mobile fitness apps require a lot of hardware integration. They need to be accurate and secure. A great app will further your business goals and make users happy. I hope that’s what you choose)
hello
I hoped that young Jacob was as yet inexperienced around girls, so that he wouldn’t see through my sure-to-be-pitiful attempts at flirting. http://cc.vmm789.com