
I’m totally phoning this one in today, you guys. This post is from last Halloween, only I got behind and didn’t post it until after Halloween last year, so I thought it deserved some time in the limelight this year. And I just honestly haven’t had nearly enough Halloween happening on the blog this year…
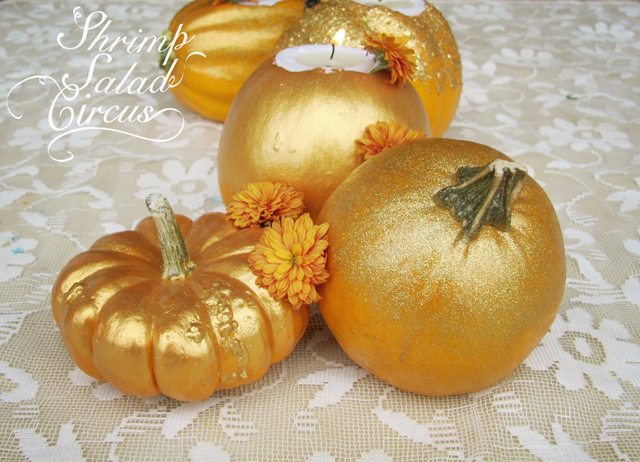
Read on after the jump for how to make three different kinds of gold, shiny, and sparkly pumpkins and turn them into pretty candle holders. This one’ll hold you through Thanksgiving, too!

Materials:
- small (the size of your palm/pomeranian’s head) pumpkins
- mod podge – the glossy variety
- fat paintbrush
- fine-tip Sharpie
- tea lights
- paring knife – the sharper the better
- gold glitter

- gold acrylic paint
- gold Glamour Dust (Buy it at Hobby Lobby – WAY cheaper than Amazon!)

1. If you want your pumpkin sitting right on its little tail-end, then skip this step. Since I had six pumpkins, I decided to tilt a few for visual appeal and variety. Tilt it however you want, and then make a dot with you Sharpie at whatever point touches the table.

This dot will become the new tail-end for your little piece of sparkle.

2. That little circle shows you where your dot is. The big circle just means to shave off a slice of pumpkin on the side with the dot. Basically, you should [carefully] hack off a piece that ends up having your little black dot in the middle of it.

3. Now that you’ve figured out what all your little fellows are going to sit on while they sparkle, head back up to the top region. For the ones you’re going to put a candle in (all of them or just some – half, in my case), set a tea light level on top, and trace around it with your Sharpie.

Here’s where you get a handy little tea light-sized circle.

4. You’re now going to hack out that circle until you can actually convince the tea light to nestle in all snug for the season. I used a paring knife here – a good one. Please, please, please be careful. I don’t want to be the cause of any stitches, scars, or war stories.
The sharper your knife, the better. If it’s dull, you’re more likely to cut yourself attempting to saw and hack through your helpless little victim.

Are you bleeding? Just leave a comment or shoot me an email, and get 911 or CSI over to your place straightaway. Hopefully we’re still at the 911 level though….
Anywho – get a little spoon (or a regular spoon, I suppose…), and scoop out the goop and gunk and guts. Or leave them. If you leave them, they’ll mold. You’ve been warned.

5. Let’s start with the glitter because it’s the most complicated. It’s not actually complicated, just more complicated than its friends. It’s like the angsty teen of the paint trio.

Pour a little bit of Mod Podge into a container. Douse it with glitter. Stir Add more glitter. You want a really heavy-duty amount of glitter. The Mod Podge is really only there to make the glitter stick. Once it’s all good and mixed, paint it on with your brush. Paint right up to the edges of the tea light crater and around the stem. You can paint the whole pumpkin or just the top half (like I did). Set aside to dry.

6. While your glittery works of art are drying in anticipation of a second coat, you can start painting on the Glamour Dust. This is an absolutely gorgeous paint you’ll find in the acrylics section of Hobby Lobby. It’s like what would happen if a fairy and a pumpkin had a wild night. Sparkly wonderful.

7. While your Glamour Dust buddies are drying, paint a coat of gold on another pumpkin or two. I used an antique gold shade because I like the warmer, richer tones. This’ll need to dry and get a second coat as well.

8. Let all your pumpkins dry, and keep adding coats until you’re satisfied with the level of glitz of each. Or, if you’re as impatient as I am (and sick of waiting to take pictures), jerry-rig your hair dryer through the medicine cabinet doors; hold it up with a can of dry shampoo; and aim it directly at your pumpkins in your tiny bathroom. Wait a fraction of the time. Do not rinse. Repeat.

You could certainly stick to one type of paint/finish if you like the look of one pumpkin in particular, but I really enjoy the mixture of textures. It’s beautiful on the coffee table or bunched in the middle of a dinner table.


Such a fun idea! I love the idea of combining sparkly gold pumpkins with candles. Jess
I am amazed with what you can do with the little pumpkins! Very nice.
Love these! They could definitely be used on a glam thanksgiving table later in the season.
Katherine
http://www.bluegrassthreadsky.com
So cool and glamorous! Love this idea!
~Sara
sarastrauss.blogspot.com
These are too cute! A nice alternative to carving a full pumpkin… plus we all know that glitter makes everything better!
I LOVE these. My only problem with doing this kind of project is that the pumpkin guts make my stomach turn – I’ve gotten sensitive to the smell! I just need someone else to do it for me, then I can glitter to my heart’s content!
Wow, never seen such glam pumpkins before! Super cute & fun tutorial, thanks for sharing! I love how it ads a festive touch to the pumpkins, something you could def use in Nov & even Dec! (Are pumpkins cheaper after Halloween?? If so I’m def running out to get some for this!) : )
http://dusanabotswana.com
Pumpkins are absolutely ok after Halloween! When I started high school, band and sports got in the way of carving time, but every year my dad bought pumpkins, determine that THIS would be the year we’d carve again. Alas, it never happened, but we kept them on the porch and added a cornucopia of fake cranberries to the display after Halloween. And we got compliments every year.
All hail the November pumpkin!
I glittered my pumpkin this year! I used super fine glitter, so it looked more like the Glamour Dust one, but I used the Mod Podge method. It’s pretty much the best pumpkin I ever made and a great way to approach pumpkin decorating if you’re too late to find a really large pumpkin for carving. And it took about 10 minutes!
I love the gold; I’ll have to get some gold glitter next…maybe for Thanksgiving decorations.