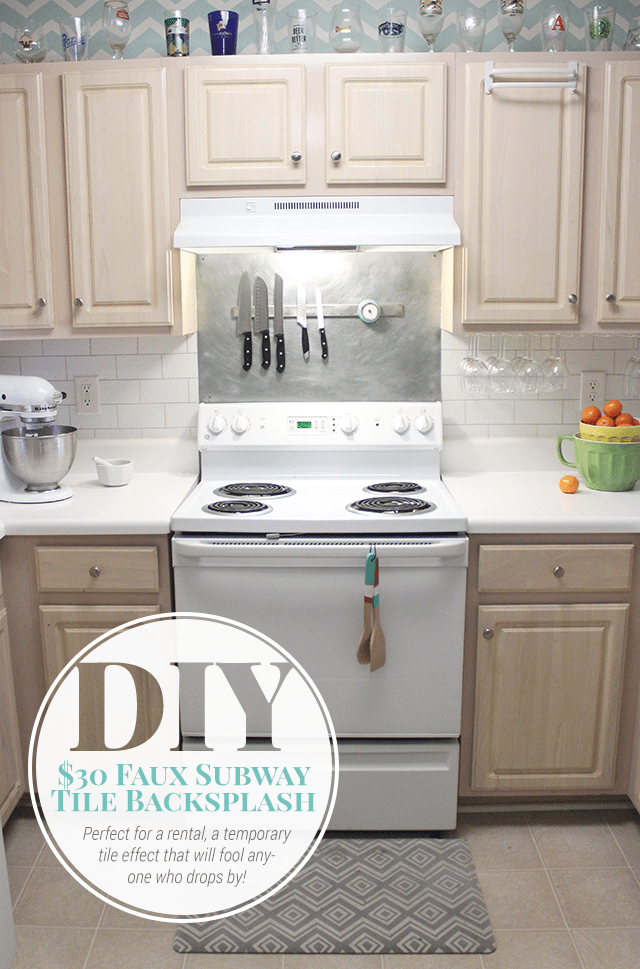
Are you a renter? Or a homeowner who isn’t quite ready to sit at the construction-worker table in the cafeteria? I haven’t had the pleasure of owning a home yet, but I’ve been through plenty of rentals. Along the way, I’ve learned how to turn a temporary home into a place that feels deeply “ours” in a way that can be turned back into a blank slate before we hand the keys back in and move out.
One of my biggest pet peeves in a rental apartment is always the tiny, cookie-cutter kitchen with off-beige walls that match the scratched laminate countertops. And then there’s the all-brass-everything and the mismatched appliances, but that’s a story for another post… Andrei and I really gambled on our current place; we didn’t get to see it until we walked in with our first load of furniture!
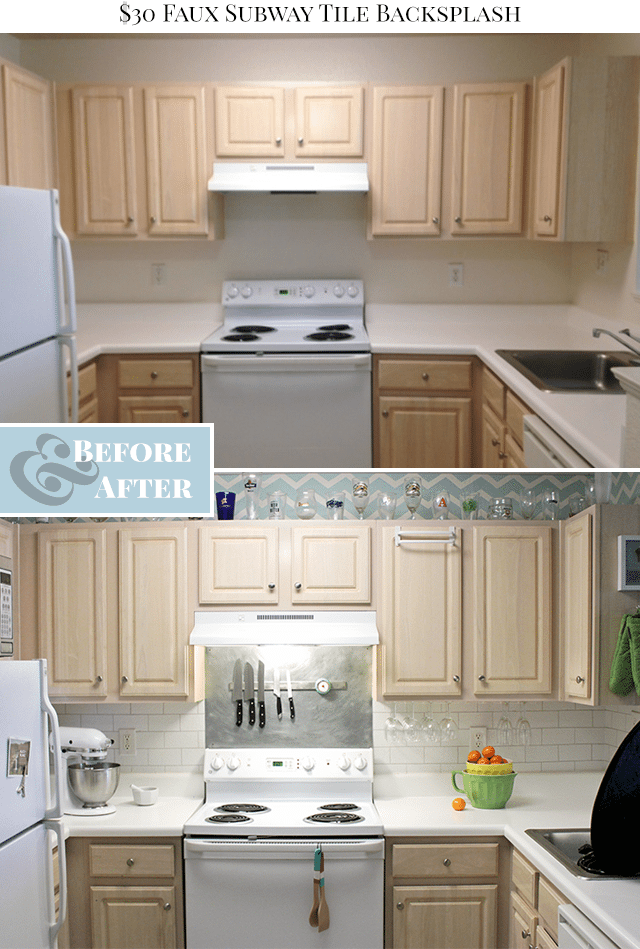
Fortunately, they updated the kitchen a bit just before we moved in — new light fixtures, cabinet hardware, etc. As you can see from the picture below, it wasn’t bad at all. It was just meh. I really wanted to tile the walls, but evidently my landlord frowns on such things. I scoured the internet; explored options like vinyl decals and laminate panels; and finally landed on this beautiful faux subway tile painted backsplash project.
P.S. I swear this post isn’t an ad for Kitchen Aid. That thing is just WAY to heavy to move for every photo. And I only got a little paint on it!
This post isn’t going to be like the tutorials you’re used to seeing on here. Yeah, there’s a supply list and step-by-step photos, but since Nicki did such a great job explaining it in this post, it would be silly to try to reinvent the wheel. I was just going to show you guys the before and after shots of our kitchen instead, but then I realized I still had a few things to say. (I always do…) Beneath each of the images below, I’ve added some commentary about what I’ve done a bit differently than Nicki or what I learned along the way that I think will help you do this faster, better, and neater than I did.
Supplies:
- High-gloss white paint
- I used Rust-Oleum Painter’s Touch Gloss White Ultra Cover.*
- Because of our small kitchen I only needed half of a one-quart can.
- Flat/matte grey paint
- I used Glidden DUO Shaded Ice Flat.
- We live in a one-bedroom apartment with a smallish kitchen, so I was able to use a $3 sample jar of paint with a lot leftover.
- Painter’s tape
- I prefer Frog Tape* for clean lines and even stickage. Yes, stickage.
- My little kitchen took about three rolls. Get way more tape than you think you’ll need. You can always return it!
- Paint roller & tray
- * I used this mini roller kit* (normally used for painting trim) because my kitchen is so small, and it made it much easier to get into smaller, hard-to-reach areas.
- Small paintbrush
- Tape measure/yardstick
- Level
- Pencil
- Wine
- I prefer a nice red. That way if you spill in the middle of the project, you’ll have lots of good, pinkish memories.
- Put it in this.
*Affiliate links: If you buy supplies through these links, I could earn a small commission to help cover my ridiculous craft supply habit, so thanks!
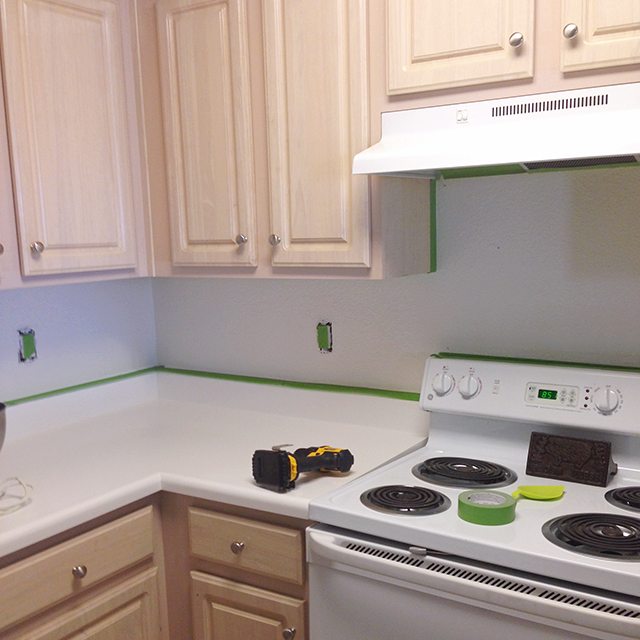
Let me start by saying I have no idea why there’s a drill in this picture. You don’t need a drill for this project. I think I’m just really into power tools. Maybe I felt like I needed some extra horsepower to remove those belligerent little switch plate covers…?
- Begin with the prep-work: removing all switch plate covers and cleaning the entire area to be painted. Since this is a kitchen project, be extra thorough so that old grease-splatters don’t ruin your paint job.
- After the walls have completely dried from the cleaning (preferably overnight), tape off all borders between the wall and the non-paint-surfaces. Stick some tape over plugs and light switches, too, just so that you don’t accidentally drip on them. Use a roller* to apply a thin, even coat of your glossy white paint. Allow it to dry for 2-4 hours (or as long as instructed on your paint can) and then another thin coat. Let it dry another 2-4 hours or overnight.
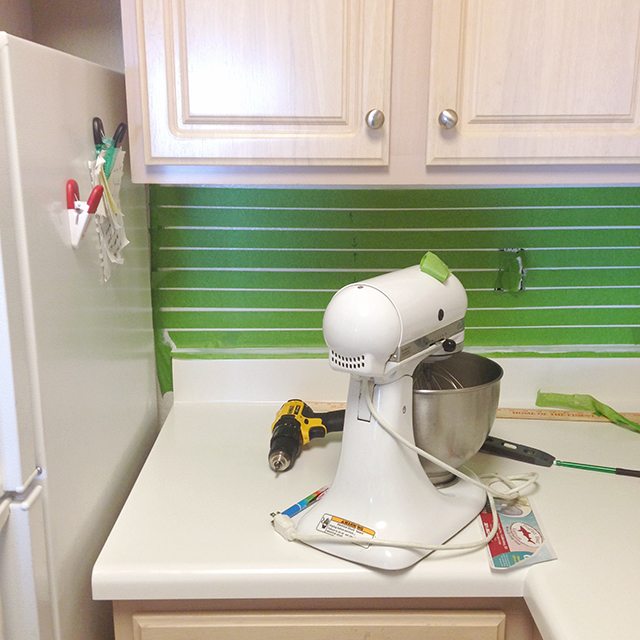
- While you’re waiting for your paint to dry, you can create a subway tile template.* I drew a 3″ x 6″ rectangle onto a piece of corrugated cardboard from an old box and cut it out. This is a pretty standard size, but you can do whatever size you like. *Nicki used an actual tile as a guide, which is a little more precise and durable, but I felt like cardboard was a little easier to maneuver and less likely to scratch the freshly-painted wall. You can do whichever you prefer.
- Once you’re sure the wall is completely dry, it’s time to start taping the horizontal “grout” lines. Lots and lots of taping. I taped off my entire kitchen at one time, but if you have a giant kitchen (sadly not a problem I have), you might want to split it into sections like Nicki did.
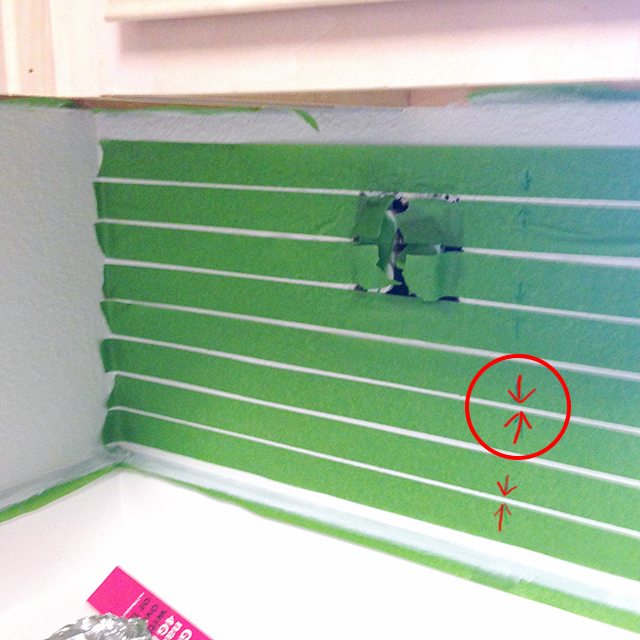
- I found it helpful to just use the edge of my yardstick as a guide for how much space to put between each row of “tiles.” About 1/8″ is ideal to get the same look I have here.
- I ended up just marking the lines with little dots and a tape measure and then lining the tape up with the dots. I checked periodically by holding up the tile template, but I didn’t use it very much other than that.
- You should check your lines every so often with a level, too. If you’re not standing back and looking, it can be hard to tell that you’ve taped an entire wall on a downward slant!
- Depending on the width of your painter’s tape, you could end up with some confusion as to which lines should be painted and which are simply in between pieces of tape. I marked little arrows pointing to the rows that should be painted so that I wouldn’t get mixed up. I marked a few of the arrows in red in the above to help you see them. This probably seems like a no-brainer, but after a couple hours of staring at rows and rows of green (or blue. Whatevs. It’s a lot of tape.), it all starts to run together. Trust me.
- Once you’ve taped it all and made sure your edges are really firmly pressed down onto the wall to prevent paint bleeding under, use a smallish paintbrush to fill in the lines with your grey paint. I did two coats but only waited about 45 minutes in between. Basically, once I got all the way around to the opposite end of the kitchen, I started back at the beginning with the second coat.
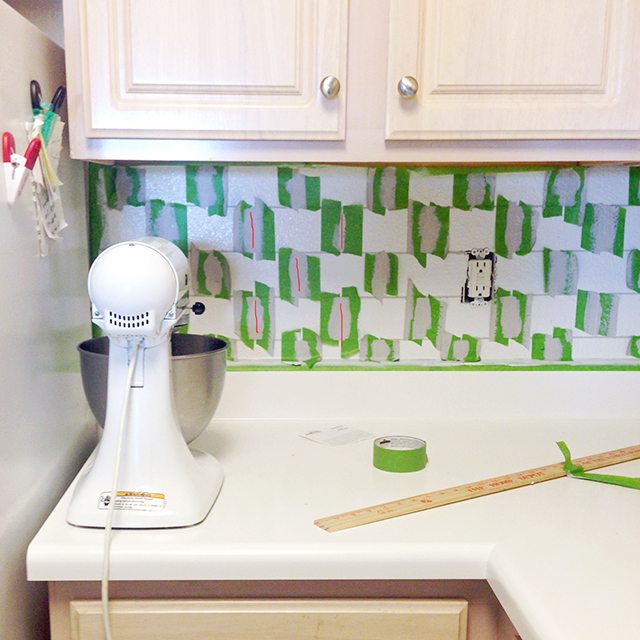
- After you’ve peeled off the horizontal tape, you can start taping the vertical lines. For a traditional subway tile pattern, the tiles are staggered from one row to the next, so you can’t just use vertical lines going straight up.
- Stick a piece of tape really firmly over a discreet spot where you painted a horizontal line and then peel it off. If any of the paint sticks to it, it’s not dry enough to tape over yet. Hold your horses. And frogs.
- Again, I taped off the whole kitchen at once, starting at one end and working my way around. Same with the two coats of paint.
- Nicki says she peeled off the tape immediately after painting, but I actually left it until I’d finished an entire step in the process. You can just check under the edge of the tape and use your judgment to see if you want to peel it right away or wait until it dries a bit.
Questions? Confusion?
If you have questions about the project or supplies — or if I’ve just left you feeling more confused than you were when you got here, then just leave a comment on this post. I’ll get back to you within a day or two to get you all sorted back out!
If you try this project yourself, please share pictures! Please!!!












Aotume
에볼플레이 먹튀검증 안전노리터
국내최고메이저 먹튀검증 안전노리터 go
I was wondering if this project would hold up in the bathroom? My bathroom needs sprucing and this project looks wonderful.
The back galvanized metal in the back of the stove where you have knives stored, I’ve seen a few people ask but don’t find a reply please please tell us how! Thank you!
Hi Rayne! Sorry to have missed comments. It’s a thin sheet of galvanized metal from Home Depot. I just screwed it directly into the wall. 🙂
Do you think it would work to paint the entire backsplash grey. Then use thin tape to mask off/ protect the grey and then paint the white? I would need the wine for all that tape. Hehe. Thanks for the post! Jill
Just bought a fixer upper, but don’t have the budget to fixer up! SO doing this! Thank you!
I’m totally with you on that, Whitney! This is SUCH a good interim solution, and I found it held up really well to scrubbing! 🙂
This is so cool. Looks really doablle too. Is the high gloss paint pretty cleanable?
. I do t see that you’ve answered the question about the metal backsplash.
I swear I’m doing this!
Julie
This is exactly what i want for my kitchen, my concern is, will the look if the drywall show through the paint? Because that’s what’s driving me nuts about my lack of backsplash. The drywall texture!
Hey Jeannette! It definitely won’t look as smooth as tile, but the high-gloss paint gives a decent illusion of it. The light bounces off the unevenness of the texture rather than settling into it and creating shadows. Several people who saw my kitchen had to go touch it after I told them it was just paint — just to make sure! 🙂
Lovely! But please do tell what have you used as cooker back splash??? galvanised metal?
Hello, I’m very impressed by your talent. My question; how did you do the part behind the stove? It looks painted but is that a type of metal sheet that you painted? If do did u use a special paint? Thanks! K
Is it just me, or does it look like the cabinets are lighter as well? They almost look whitewashed. I am totally heading to lowes this week end to get glossy paint and a gray sample!! I have super gross off white-ish walls in my kitchen. Been wanting to do tile..but Hubby no so much 🙁
This looks incredible! Such a huge difference in your kitchen! My hubby and I are house-searching right now, so depending on our next kitchen, I may have to try this idea. 🙂
Be sure to share pictures with me if you do, Draven! 🙂
WOW I can not wait to start this project. Thanks for sharing. We are downsizing and have purchased a fixer upper. Being on a budget but enjoying style this will be great.
I’m so excited that you’re going to try this in your new home, Deanna. Please PLEASE share pictures when you do. I can’t wait to see!
You did a wonderful job!! Such a huge difference. Very classy!!
Thanks so much, Christina! I love when a small-scale project can make such a hug impact. 🙂